Considerations for Additively Manufactured Parts
I grew up watching Star Trek: The Next Generation, and among the many amazing technological achievements commonplace aboard the USS Enterprise NCC-1701-D, I found replicator technology was one of the most interesting. The prospect of having whatever you want, built to your exact specifications, was scintillating yet farfetched. Today, significant steps have been made towards turning this type of science fiction technology into science fact.
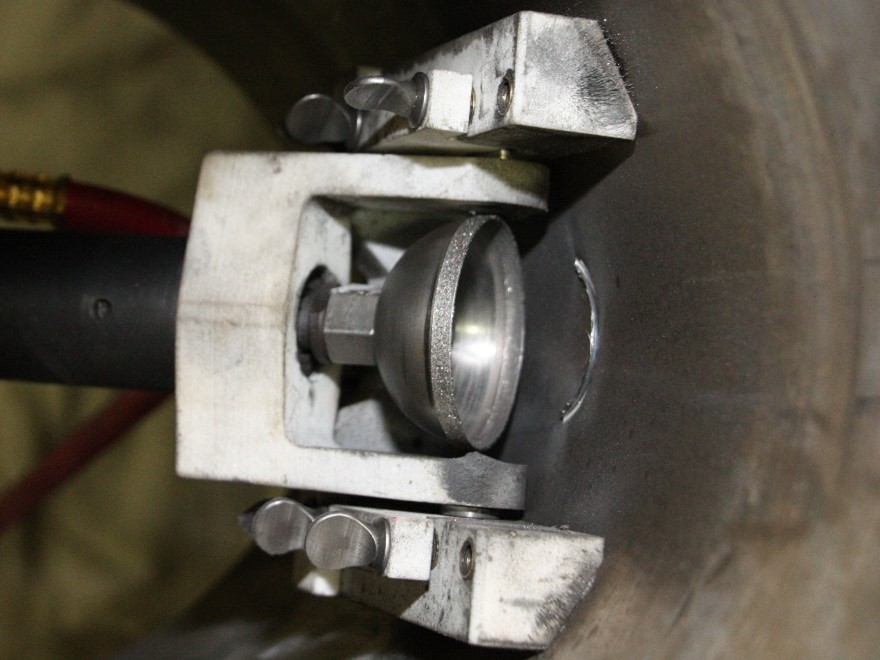
We can acquire hot earl grey tea in a matter of moments, and machine components can be additively manufactured with the push of a button (process development and robotic programming not withstanding). Take for instance, additive manufacturing (AM). Stress Engineering Services has used AM to create fixtures to enhance our testing and analysis work, such as modifications to our scoop sampler to custom fit components with a variety of internal diameters (see Figure 1).
Additive Manufacturing
AM is also known as rapid prototyping, 3D printing, or weld buildup and includes a wide range of techniques for metallic parts, such as wire arc additive manufacturing (WAAM), directed energy deposition (DED), laser powder bed fusion (LPBF), ultrasonic additive manufacturing (UAM), binder jetting, and more. AM parts have been used in the aerospace industry for many years, but their use in the energy sector is more recent. It is, however, ramping up quickly. Recently, energy sector operators and suppliers have published multiple success stories, including large and small-scale AM parts for upstream and downstream applications. In one case, Lincoln Electric delivered large-scale 3D printed replacement parts to help bring a Chevron refinery back online (press release). In another case, ConocoPhillips retrofitted existing choke cage valves with 3D printed components (press release).
Additively manufactured components are considered by some as merely large weldments, and special efforts to characterize them are sometimes dismissed on the basis that the energy industry already has a lot of experience observing weld behavior. There is some truth to this perception, but it is overly simplistic and fails to appreciate the complexity of how different fabrication techniques and build patterns affect a material’s response to various environmental and loading conditions. Traditional welds are typically made with consistent bead orientations and represent a limited portion of an overall assembly. When possible, integral transitions are often preferred over welds in critical sections. Where welds are necessary in areas with high stress concentrations, such as nozzle attachments, they are often specially sized, reinforced, and/or overmatched so that there are no weak spots in the design.
AM parts do not always have this luxury, particularly in applications where the advantages of AM are size, material, and weight savings. AM methods may also be used to make parts out of materials that are not traditionally welded, such as age-hardened nickel-based alloys. For these alloys, the heat-treating procedure may need to be adjusted from those used on wrought or cast components to optimize the final microstructures. As-printed microstructures by some processes may require higher temperature, or longer times at temperature, in order to dissolve secondary and tertiary constituents. Though some alloys are a challenge to print, AM processes also allow for material innovations and the fabrication of ingenious composite solutions. Companies like Elementum 3D are pushing the boundaries of alloy powder consumables that can be used in the fabrication of metal matrix composite parts with improved properties.
One of the primary challenges for AM components of all types, is qualifying them for service so that operators and end users can use them with confidence. Like welds, the range of qualification is restricted based on essential variables, i.e., variables in which a change may impact the performance of the material. For traditional welds, essential variables are considered to affect tensile properties, and supplementary essential variables are considered to affect impact toughness. Essential variables for AM parts are similar, typically including the essential and supplementary essential variables from traditional welds and several variables specific to the machine and program used to fabricate the build. The actual variables restricted for each qualification will depend on the code to which the qualification was performed and specific design requirements.
Anisotropy
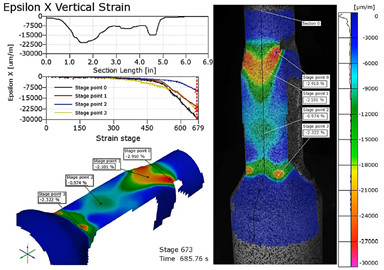
One important aspect of AM materials that code qualifications aim to characterize is anisotropy: the difference in properties exhibited in different directions. Anisotropy is not unique to AM materials. Rolled, drawn, and extruded products often exhibit different material properties in the direction of working than across it. Due to the layer-by-layer construction of AM products, material properties determined within a layer and across several layers can also be substantially different. The anisotropy of AM parts is important to understand and account for in the design, particularly if an AM part is replacing a wrought or cast part that was more or less isotropic. Anisotropy is difficult to predict in complex AM parts, but advanced techniques such as digital image correlation (see Figure 2) can be a useful tool to better understand how the strain in a part is distributed and oriented under various loading conditions.
Build Variability
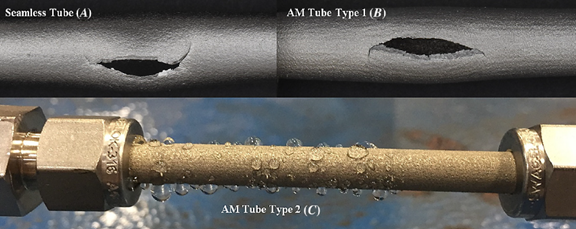
Another aspect that AM qualification seeks to address is machine-to-machine (and supplier-to-supplier) variability. When a machine and procedure are not properly qualified, results can be disappointing. Stress Engineering Services has experienced this firsthand during our work testing and characterizing AM parts. Type 316L stainless steel tubes produced by multiple suppliers using LPBF were sent to us for pressure testing, and it did not take us long to discover that the tubes from one supplier leaked significantly (see Figure 3). It turned out that the machine and consumables used by this supplier had not been properly qualified to produce the part. The result was incomplete powder fusion and interconnected porosity throughout the tube wall.
This is an extreme example, but it highlights the importance of qualifying both the machine and manufacturing procedure before producing parts for use and following those procedures during production. In production, it is of critical importance that qualification test coupons are representative of the parts they are intended to qualify, so that issues like these can be caught early.
Component Quality
Despite the extensive qualification measures in place for AM parts, several aspects of performance are not currently covered in code qualifications. These include, but are not limited to:
- Corrosion resistance
- Environmentally assisted cracking resistance
- Fatigue performance
- Properties at elevated temperatures
- Inspectability
Component quality is crucial for all parts, but due to the iterative way they are constructed, AM parts can be susceptible to higher flaw densities, which can be particularly deleterious to corrosion resistance and fatigue performance. Inspection procedures and acceptance criteria, therefore, need to be carefully reviewed. Inspectability of AM parts is entire topic of discussion in itself, particularly in cases where surfaces are left in the as-printed condition due to economic or accessibility restrictions. Various x-ray and computed tomography techniques are actively being considered and debated throughout the energy industry, and my colleagues at Stress Engineering Services have had good success utilizing acoustic emission testing to detect active flaws during proof and qualification testing.
Damage Mechanisms
Like with wrought and cast materials, service environments and service-related damage mechanisms for AM parts need to be considered, understood, and accounted for in the designs. Because the responses of AM materials to fatigue, corrosion, and environmentally assisted cracking are complex and not fully understood, it is critically important to seek counsel from subject matter experts with metallurgical, welding, and corrosion engineering experience and expertise.
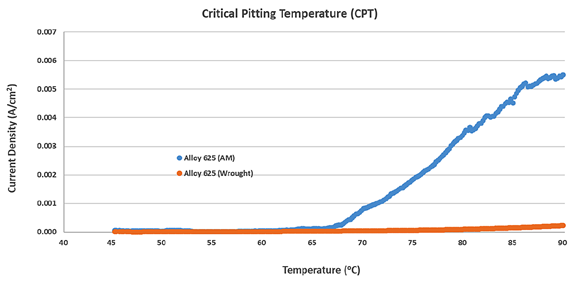
It is well established that the corrosion resistance of weld metal in the as-welded condition is typically less than base material of a similar composition. The same is true for AM parts. Figure 4 shows the results from potentiostatic pitting tests performed on wrought and AM alloy 625, which revealed a substantial decrease in the AM material’s resistance to pitting in an acidified ferric chloride environment, even after a solution annealing heat treatment. Other work in the open literature also shows a reduction in AM pitting resistance relative to wrought material, and some work suggests a complicated material response to subsequent heat treatment. Composition, heat treatment, microstructure, surface finish and other parameters all need to be reviewed carefully before putting parts in service.
AM technology is constantly improving, and while the replicators of Star Trek remain science fiction, the capability to quickly fabricate custom components is now a reality. The writers of Star Trek never had to grapple with the difficulties of validating replicator technology, the challenges inherent in ensuring consistent performance from machine to machine, or inspection methods for quality assurance of production parts (new episode idea!).
As actual engineers in the real world, we do need to consider these things. Characterizing the materials, controlling essential manufacturing variables, and establishing reliable inspection techniques will be instrumental to the continued successful expansion of AM technology throughout the energy industry.
About the Author:

Adam C. Rowe, PE – Principal, Houston Office
Adam Rowe has over fifteen years of experience in material evaluations, corrosion assessments, welding metallurgy, and metallurgical failure analyses. In addition, he has prepared numerous material specifications and welding procedure specifications to meet industry standards and client requirements, particularly the requirements of ANSI / NACE MR0175 / ISO 15156.
Mr. Rowe holds both a Bachelor of Science degree and a Master of Science degree in Metallurgical and Materials Engineering from the Colorado School of Mines. He is a registered professional engineer in the State of Texas.


Leave a Comment
You must Register or Login to post a comment.